
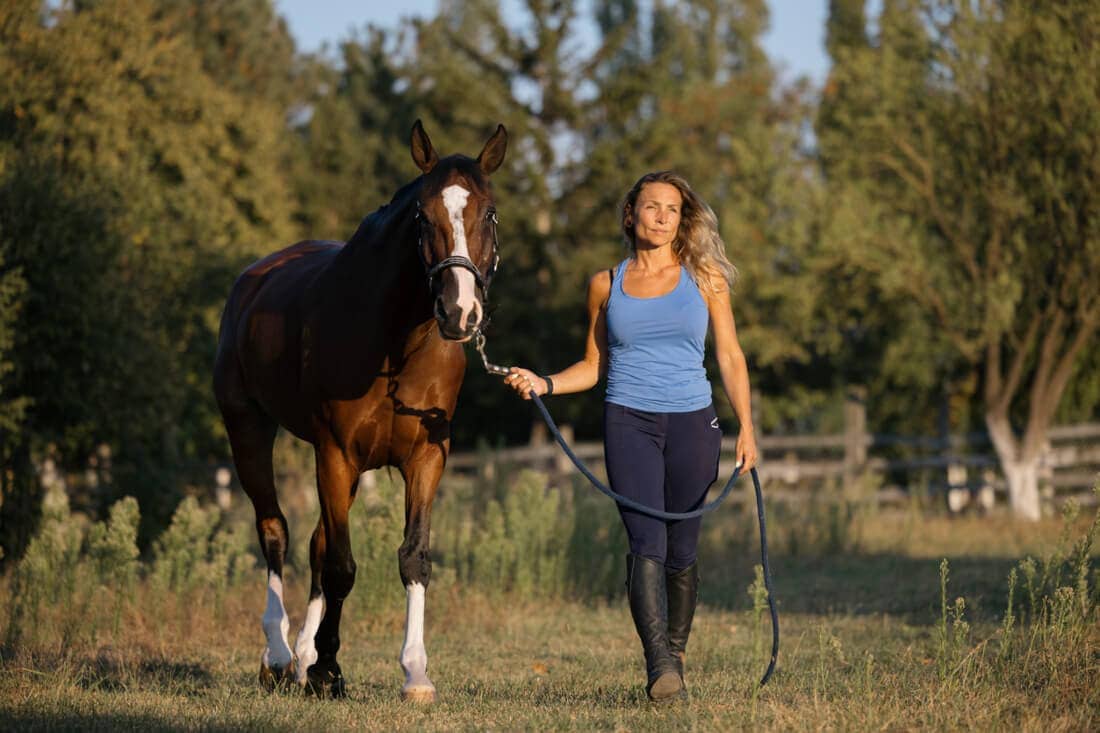
Halter training is the process of teaching a horse to calmly accept and respond to a halter and lead rope, including responding to cues, standing quietly, and moving when asked. It provides the foundation for safe, controlled interaction between horses and humans.
Before a horse can be reliably led, tied, groomed, or loaded onto a trailer, they must first learn to understand and respond appropriately to halter cues. These early lessons establish how a horse interprets pressure, release, and guidance from a handler.
Because halter training shapes a horse’s earliest understanding of human cues, it is one of the most valuable opportunities to establish good habits from the beginning. When done effectively, halter training teaches the horse to stay relaxed, follow guidance without resistance, and remain confident in unfamiliar situations.
Keep reading to learn more about halter training, including types, training tips, and a helpful walkthrough of the basics. With patience, consistency, and the right approach, halter training is a practical skill that supports safer handling for both horse and human in every setting.
The Importance of Halter Training Horses
Halter training is one of the most important skills a horse learns, yet it is often rushed or oversimplified.
Horses who are effectively halter trained (also referred to as “halter-broke“) are safer to handle, easier to care for, and less likely to panic during routine situations like veterinary visits, farrier work, or trailering.
Many handling problems seen later in a horse’s life, such as pulling back when tied, dragging handlers, crowding, or becoming head-shy, can often be traced back to gaps in early halter training.
Taking the time to train your horse correctly builds trust, clarity, and confidence on both sides of the lead rope. With patience and consistency, following a clear halter training process works for foals, adult horses, and even horses with little or no previous handling.
What's your top priority with your horse's health?
What's your top priority with your horse's health?
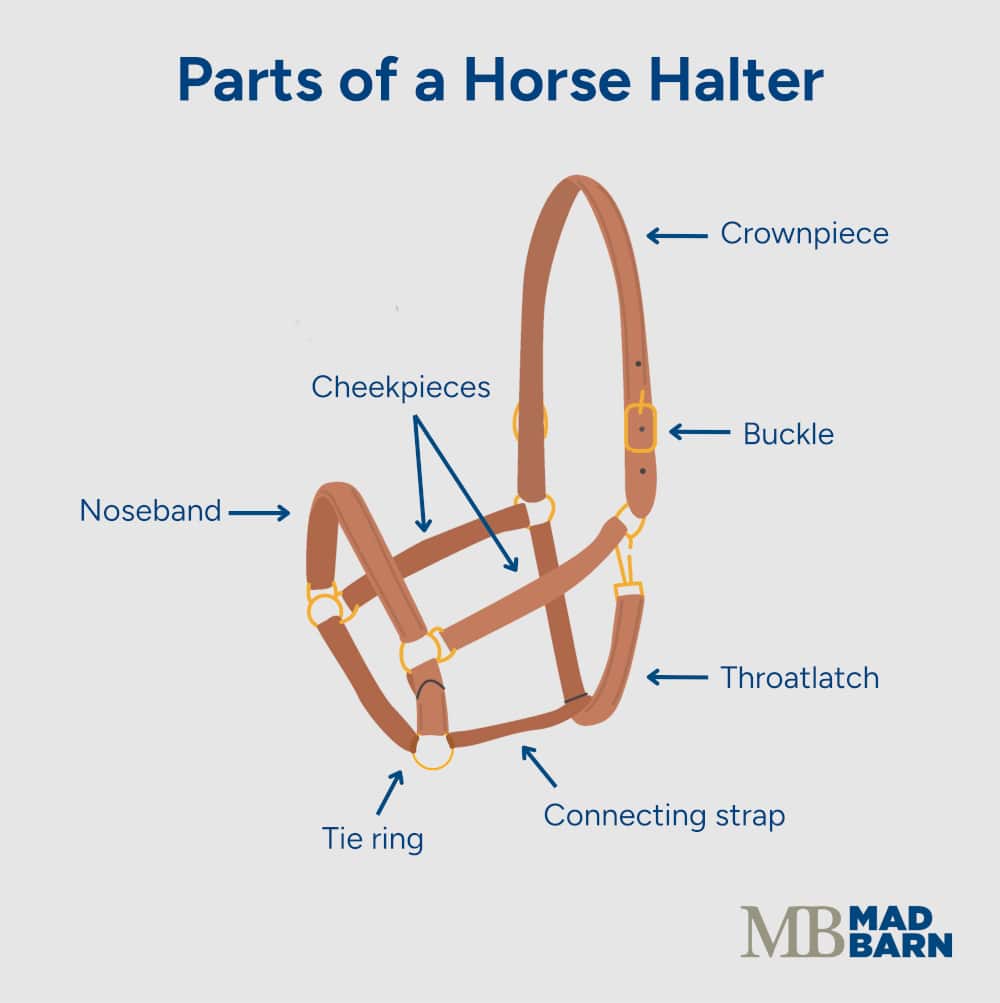
Types of Halters for Training & Everyday Handling
Choosing the right halter for your horse can make halter training safer and more effective.
The most commonly used types of horse halters include: [1][2]
- Nylon: A strong, durable, and affordable option. With soft edges that prevent chafing, this style is available in various colors and sizes.
- Leather: Traditional and safe, leather halters break under extreme pressure, reducing the risk of injury if the horse panics. These halters require regular maintenance.
- Rope: Lightweight and adjustable, rope halters provide precise pressure cues but can be harsh if misused. Best suited for experienced handlers.
- Breakaway: Typically made with a leather crown or designed to break under tension, these halters add an extra layer of safety for horses prone to pulling back.
The correct style of halter depends on the horse’s temperament, age, and the handler’s experience. A well-fitted halter is essential to avoid discomfort or unintended pressure points.
Pressure & Release Methods in Equine Halter Training
Horses are typically trained using pressure and release methods, which are a form of negative reinforcement described in learning theory.
During halter training, the horse feels gentle pressure from the lead rope or halter. When the horse responds by moving in the correct direction, the pressure is released. This release serves as the negative reinforcer. Over time, the horse learns that yielding to pressure removes the stimuli, potentially alleviating the aversive experience associated with it. [2][3][4][5][6][7]
Using pressure and release effectively requires accurate timing, rather than strength or force. Horses do not learn faster from stronger pressure; they learn when the release happens at the exact moment they respond correctly. If pressure is held too long or released too late, the horse can become confused, frustrated, or fearful.
Effective negative reinforcement helps create training that:
- Gives the horse a clear choice
- Allows calm responses without force or escalation
- Builds confidence and trust over time
- Improves safety during handling, leading, and tying
Problems typically occur when pressure is too strong, inconsistent, or never released. If the horse doesn’t understand what is being asked, they may panic, shut down, or develop unwanted habits. Clear pressure followed immediately by release helps the horse understand the cues, respond willingly, and stay calm throughout training.
4-Step Guide to Halter Training a Horse
Halter training works best when broken into clear, progressive steps. Each step builds on the last, helping the horse move from being comfortable with equipment to responding calmly to pressure, following cues, and standing tied without fear.
Training sessions should be kept short, calm, and consistent, as horses learn best when they remain relaxed and engaged. Moving carefully through each stage ensures safety for both horse and handler while building trust and confidence. [8]
1) Desensitization to the Halter & Lead Rope
The first step in halter training is helping the horse get comfortable with the halter and lead rope. Let the horse see and sniff the equipment, allowing them to explore it at their own pace. Once the horse is calm, start gentle handling, moving slowly and carefully.
Horses are sensitive, so if they show signs of tension, such as pulling back, raising their head, or stiffening, pause and back off. Wait until they relax before continuing. [2]
- Touch the halter and lead rope to your horse’s neck, shoulders, body, legs, head, face, and ears
- Practice putting the halter on and taking it off several times, always moving calmly and deliberately
- Use positive reinforcement, such as small treats, gentle scratching, or petting when the horse remains relaxed
The goal is to build trust, prevent head-shyness, and set a strong foundation for all future training. Introducing the halter slowly ensures the horse develops confidence, making the next steps smoother and safer.
2) Teaching the Horse to Yield to Halter Pressure
Once the horse is comfortable with the halter, start teaching them to yield to pressure. Negative reinforcement during this phase teaches the horse that responding correctly makes the pressure go away.
Start while the horse is standing still. Begin with gentle, side-to-side pressure, which helps the horse understand how to yield and creates a safe “emergency stop” if they brace forward. Once the horse responds consistently, pressure can be applied in all directions: forward, backward, upward, and downward. [2][8]
Tips for teaching yielding include: [2][3]
- Keep pressure light and release immediately when the horse responds, even slightly
- Avoid holding pressure too long or applying it too strongly, which can confuse or frustrate the horse
Practicing this method builds confidence and trust, and prepares the horse for following cues, stopping, and tying calmly.
3) Leading & Stopping Calmly in Halter Training
After the horse understands yielding to pressure while standing, it’s time to introduce movement. This step teaches the horse to lead safely and stop when asked. [2][3]
To train your horse to follow and stop using a halter:
- Ask the horse to step forward using gentle pressure on the lead rope
- Release pressure as soon as the horse begins to follow
- Introduce stopping with light backward pressure, gradually reducing the cue as the horse learns
- Continue practice until the horse can follow and stop reliably with minimal or no pressure
This step is important because it prevents common handling problems, such as the horse dragging the handler, crowding, or rushing past. A horse that follows calmly and stops when asked is safer and easier to manage, making grooming, veterinary visits, and trailering predictable and stress-free.
4) Standing Tied Safely
The final step in halter training is teaching the horse to tolerate being tied safely. Tying should only be introduced after the horse consistently yields to pressure and leads calmly. [3][9]
To introduce tying to your horse:
- Loop the lead rope around a secure anchor point, like a fence post, or use a tie ring that allows some give. Holding the free end at first lets the horse feel pressure without feeling trapped.
- Apply gentle pressure without trapping the horse. Always use a quick-release knot. This is crucial for safety. A single, simple pull on the rope frees the horse if they panic or pull back, preventing injury to both horse and handler.
- Release pressure immediately when the horse steps forward, softens, or relaxes.
Repeat short sessions several times, allowing the horse to gradually gain confidence. Over time, they can be tied for longer periods while remaining calm and cooperative. Consistently using quick-release knots teaches the horse that being tied is safe and predictable, reinforcing trust while minimizing risk.
How to Tie a Quick-Release Knot
For a safe and effective quick-release knot: [9][10]
- Anchor the Rope: Loop the lead rope around a secure tie ring or post. Ensure the point of attachment is sturdy and safe.
- Form a Loop: Make a small loop in the rope, leaving a free end long enough to pull easily.
- Cross the Rope: Take the free end and cross it over the standing part of the rope (the part connected to the horse).
- Tuck Through the Loop: Pass the free end through the loop you created.
- Adjust Snugly: Pull the knot snug, but don’t make it tight. The horse should feel secure but not trapped.
- Test the Release: Always pull the free end to confirm the knot releases immediately. One simple tug should free the horse completely.

Tying your horse with a quick release knot can ensure their safety. The horse learns that being tied is predictable and controlled, giving them confidence while keeping handlers safe.
Common Halter Training Problems & Corrective Strategies
Even with careful training, horses can develop behaviors that make halter training challenging. Understanding these common issues and how to address them keeps both horse and handler safe and reduces stress. [8][11]
Common behavioral issues your horse may have while halter training include: [8][11]
- Freezing: This is often a sign the horse is unsure or overwhelmed. Pause, reduce pressure, and encourage small steps forward. Go back to desensitization or side-to-side yielding if needed.
- Pulling back: Horses that do not fully understand pressure and release may panic when they feel trapped. Always start by looping the lead rope around a secure anchor or using a tie ring that allows some give, rather than tying solidly. Release pressure immediately when the horse steps forward or softens. Gradually progress to tying normally as confidence grows.
- Crowding or rushing past the handler: This can happen if forward pressure isn’t applied consistently or cues are unclear. Revisit the follow-and-stop step, practicing calm, patient movement.
- Head-shyness or resistance: Hesitation around taking the halter is often caused by moving too quickly or skipping desensitization. Go back to the first step, use slow handling, and pair with positive reinforcement like petting or treats.
Effective troubleshooting requires observing, adjusting, and repeating training steps until they stick. Most problems can be resolved by returning to the foundational steps, reinforcing calm behavior, and moving at a pace the horse can handle.

What to Avoid When Halter Training a Horse
Even experienced handlers can make mistakes during halter training that slow progress or create safety risks. Being aware of these potential setbacks helps ensure training is effective, safe, and positive for both horse and handler. [8][11]
Common handler mistakes when halter training horses include: [8][11]
- Rushing: Horses learn best when using short, calm sessions rather than long, stressful ones. Keeping sessions fun and engaging helps the horse stay focused, relaxed, and willing to participate.
- Excessive force or inconsistent cues: Using strong or unpredictable pressure can confuse the horse and create fear. Timing and light, consistent pressure are far more effective.
- Premature tying: Tying a horse that does not understand pressure and release is very dangerous. Without the ability to yield safely, the horse may panic, pull back, or injure themselves or the handler.
- Misreading body language: Horses communicate through body language. Failing to pause when they are tense can create long-term fear or avoidance.
By avoiding these mistakes and ensuring sessions are short, consistent, and enjoyable, you can create a safe learning environment for your horse.
Expected Timelines for Halter Training a Horse
The length of time it takes to halter train a horse varies widely depending on the horse’s age, temperament, past experiences, and consistency of training. Some horses may begin to respond calmly within a few sessions, while others may take several weeks to become fully confident and reliable. [2][8]
It’s important to remember that progress is more important than speed. Short, consistent, and gentle training sessions yield better results than long, demanding sessions. Horses learn best when they’re relaxed, focused, and rewarded for correct behavior.
Signs that your horse is ready to move on to the next step include:
- Calmly wearing the halter and lead rope without tension
- Yielding to light pressure in multiple directions
- Following and stopping reliably on cue
- Standing safely when tied, without panicking or pulling
Consistency, patience, and positive reinforcement are key. Each horse learns at their own pace, and respecting their needs and temperament ensures training is safe, effective, and builds trust between horse and handler.
Frequently Asked Questions
Here are some frequently asked questions about halter training horses:
Halter training for horses teaches them to calmly accept a halter and lead rope while responding to basic handling cues. Early halter training helps horses learn pressure and release, follow guidance, stand quietly, and move when asked. These lessons create safer daily handling and give horses a clear, steady foundation for grooming, tying, veterinary care, and trailer loading.
Halter training is important for horses because it builds the basic skills needed for safe, controlled handling. Horses with solid halter training are usually easier to lead, tie, groom, and manage during farrier visits or veterinary care. Good early training also helps prevent common problems later, such as pulling back, dragging handlers, crowding, or becoming nervous about the head and face.
Basic steps in halter training horses usually start with desensitizing them to the halter and lead rope before moving on to pressure and release. From there, horses learn to yield to light pressure, walk forward, stop calmly, and eventually stand tied without fear. Keeping each step short, quiet, and consistent helps horses stay relaxed and understand what the handler is asking.
Pressure and release during halter training teaches horses that a correct response makes the halter or lead rope pressure go away. Horses learn best when the pressure stays light and the release happens right when they respond, even if the try is small. Clear timing matters more than force, since strong or delayed pressure can create confusion, fear, or resistance.
Best halters for training horses depend on the horse's age, temperament, and the handler's experience. Nylon halters are common because they are durable and comfortable, while leather and breakaway halters add safety by releasing under extreme pressure. Rope halters can give more precise cues, but they are better suited to experienced handlers. Proper fit matters just as much as halter style.
Halter training timelines for horses can range from a few sessions to several weeks, depending on age, temperament, past handling, and training consistency. Some horses settle quickly, while others need more repetition before they feel confident and reliable. Steady progress matters more than speed, since short, calm sessions usually produce better results than long sessions that leave horses tense or overwhelmed.
Halter training problems often include freezing, pulling back, crowding the handler, rushing forward, or resisting the halter around the head. These behaviors usually point to confusion, tension, or gaps in the earlier steps. Going back to desensitization, improving cue clarity, and rewarding calm responses can help horses rebuild confidence and understand the lesson without adding more stress.
Tying during halter training should begin only after horses understand how to yield to pressure and lead calmly. Starting too early can make horses feel trapped and increase the risk of panic or injury. Early tying lessons often work best with the rope looped around a secure post or used with a tie ring that gives some movement while the horse learns to step forward and relax.
Quick-release knots help when tying horses by making it possible to free them fast if they panic or pull back. A properly tied quick-release knot should stay secure during normal handling but come loose with one simple pull on the free end. This makes tying safer for both horses and handlers while also helping horses learn that standing tied can feel predictable and controlled.
Common halter training mistakes include rushing lessons, using too much force, giving inconsistent cues, tying too soon, and missing signs that horses are getting tense. These mistakes can slow learning and make horses more fearful or resistant. Short, calm sessions with light pressure, clear timing, and attention to body language usually create better results and a safer experience for everyone involved.
Summary
Halter training builds trust and confidence between horse and handler while making daily care safer and easier.
- Horses learn through pressure and release, understanding that yielding to gentle cues brings relief and rewards
- Start with desensitizing the horse to the halter and lead rope, moving slowly and using positive reinforcement to encourage calm behavior
- Teach the horse to give to pressure, follow, and stop reliably before introducing tying
- Always use quick-release knots when tying to keep both horse and handler safe and reinforce trust
- Short, consistent, and enjoyable sessions prevent fear, confusion, and common handling problems
References
- Beckley. B. et al. Defensive Horse Safety. USDA Forest Service. 2007.
- Bickel. B. Safe Horse Handling. Extension Penn State. 2026.
- Mills. D. S. and McDonnell. S. M. The Domestic Horse: The Origins, Development and Management of Its Behaviour. Cambridge University Press. 2005.
- Carroll. S. L. et al. Moving toward Fear-Free Husbandry and Veterinary Care for Horses. Animals. 2022.
- McLean. A. N. The Positive Aspects of Correct Negative Reinforcement. Anthrozoös. Routledge. 2005.
- McLean. A. N. and Christensen. J. W. The Application of Learning Theory in Horse Training. Applied Animal Behaviour Science. 2017.
- Bradshaw-Wiley. E. et al. Combined Reinforcement: Poisoned Cue or a Panacea for Modern Equine Training? A Narrative Review. Applied Animal Behaviour Science. 2025.
- Russel. M. Halter Breaking Your Horse. University of Arkansas Extension.
- Restraint Techniques for Large Animals. Sandia National Laboratories.
- Tying the Quick Release Knot. Wisconsin State Extension. 2024.
- Marlin. D. J. et al. An Online Survey of Equestrian Headcollar Use and Safety. Equine Veterinary Education. 2022.


