


Setting up show jumps at home allows riders to practice jumping skills, build confidence, and improve communication with their horse outside of formal lessons or competitions.
However, jump training carries inherent risks, making safety a critical consideration when building and arranging fences. A well-planned setup helps reduce the chance of refusals, awkward jumping efforts, falls, or equipment-related injuries.
In show jumping, horses must approach fences in balance, judge the height and width of the obstacle, and land safely while maintaining rhythm for the next stride. Poor footing, unstable equipment, incorrect distances, or visually confusing fences can make these tasks more difficult for the horse and increase the likelihood of accidents.
Creating a safe jumping environment requires careful attention to footing, jump equipment, obstacle design, and course layout. This guide explains how to set up show jumps safely at home, including choosing an appropriate location, building fences that can fall freely, designing jumps that horses can judge clearly, and planning simple courses suited to the available space and the horse’s level of training.
Setting Up Your Own Show Jump Course
Safe jump setups depend on several key factors, including the riding surface, the equipment used, and the design and placement of individual fences. Understanding these elements helps riders create a training environment that supports both safe and effective jumping practice.
Arena footing refers to the surface material used in riding arenas to support traction, cushioning, and stability for horses during exercise. Proper footing is especially important for jumping, where horses must land with significant force and immediately rebalance for the next stride.
The ideal jumping location is a well-maintained arena purpose-built for show jumping. Many arenas have a sand-based footing 2 – 6 in (5 – 15 cm) thick. [1] Other footing types include synthetic fibers, rubber, or wood chips. [1] Curated grass arenas are also popular for show jumping. [2]
Good footing should absorb the shock of the horse landing off a jump, while also providing a solid surface for the horse to land on and push off from. [2] The footing should also be even, without significant “holes” or valleys throughout the arena. Finally, it should be consistent with no slick or excessively hard spots that may interfere with the horse’s way of going.
Before jumping, walk the arena on foot to identify any areas to avoid. Mark these out carefully using a visual identifier such as a pylon or jump standard.
When warming up your horse, feel their movement as they turn, accelerate, and slow down. Note any tripping or stumbling. If the horse does not feel secure on their feet during warm-up, do not jump on that surface. Choose an alternative jumping area or change your riding plan for the day to flatwork or polework only.
Arena Size Requirements for Jumping at Home
Adequate space is essential for safe jump training. Horses need sufficient room to approach a fence in balance, take off comfortably, and land with enough space to regain rhythm before the next turn or obstacle.
When jumps are placed in an area that is too small or crowded, horses may feel rushed or unbalanced, increasing the risk of refusals, awkward jumping efforts, or falls.
A full-size show jumping arena typically measures about 20 x 60 m (65 x 200 ft). While this amount of space is ideal for setting complete courses, many riders train successfully in smaller arenas by keeping the layout simple.
When jumping at home, aim to provide:
- At least 4 – 5 canter strides of straight approach before each fence
- Enough landing space for the horse to rebalance after the jump
- Room to make gradual turns rather than tight corners
- Clear space free of obstacles, fences, or arena walls near the landing zone
If the available riding space is limited, focus on individual fences, simple lines, or gymnastic exercises rather than building a full jumping course. These exercises allow horses and riders to develop technique and confidence without requiring a large arena.
What's your top priority with your horse's health?
Enter your email to receive your store credit
Safe Jump Equipment
All equipment used for setting a jump course should be in good repair with no pointy or sharp surfaces. Before setting a course, check the equipment thoroughly for cracks, splinters, and rust.
The basic components of a jump are:
- Standards: The wings that hold up the poles
- Jump poles: The horizontal bars the horse jumps over
Many riders also use “fill” such as boxes, flowers, planks, or panels to decorate the jumps. [2] Standards and fill should be heavy enough at the base to stand up on their own and resist the wind. Adding sandbags can help improve stability of these materials. Any materials used for fill must be able to withstand a horse stepping on it and should not include holes that could entrap a horse’s hoof.
Safety cups, also known as breakaway jump cups, are specialized hardware that hold jump rails on the standards while allowing the rail to release if struck with sufficient force. These cups are widely recommended in show jumping because they help prevent horses from getting caught in a fence during a jumping effort.
Jump cups attach to the standards and hold up the jump poles. The safest type of jump cup are breakaway or safety cups which attach to pinless track systems. [3]
These cups separate from the standard when hit with sufficient force, dropping the pole and helping prevent the horse from falling. Ideally, set all rails of your jump using safety cups. At a minimum, safety cups should be used for the back rail of all oxers to improve safety. [3]
Risky Jump Equipment
Commonly used jumping equipment that can pose a safety concern includes:
- Metal pin jump cups: The metal pin sticking out from the standard can pose a risk to a falling rider or horse.
- Pallet-based jump fill: Pallet wood can break easily and the gaps between pallet boards are often large enough to entrap a horse’s hoof.
- PVC pipe jump poles: These poles are prone to splintering and forming sharp points if a horse falls or steps on them. They are also very lightweight, meaning they often bounce when hitting the ground. This can cause them to bounce up under the horse, entangle in the horse’s legs, and increase the risk of a trip or fall.
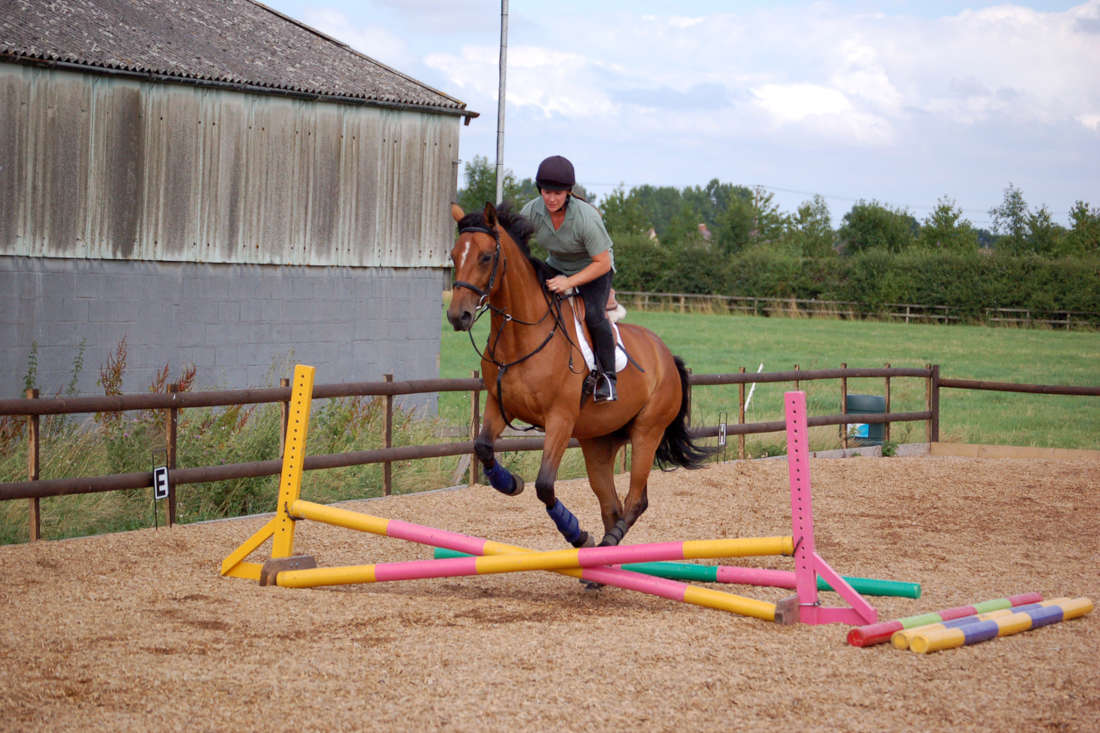
Setting the Jump
There are two main components to jump safety: how it is set, and how it is designed.
When setting up a jump, the main consideration is whether the poles can fall freely. Poles that do not move easily can cause serious horse falls, including rotational falls.
Check that the standards are not pinching the jump rail. The pole must be able to roll freely on the jump cup. [3] Ensure that if hit from the side, the rail drops easily to the ground and does not bounce.
Always remove unused jump cups from jump standards, as the cup can pose a safety risk for falling horses or riders. [2]
Jump Design & Horse Vision
The jump’s design can affect the horse’s perception of the fence and their ability to jump it. If the horse cannot accurately judge a fence, they are at risk of taking rails, jumping awkwardly and unseating their rider, stumbling, or falling.
Horses have different vision than humans, as their eyes are on the sides of their head. This allows them to see around them to avoid predators, but they cannot see directly in front of them.
When a horse approaches the jump, they lose sight of the fence just before they leave the ground. [2] The horse uses the strides leading up to the jump to determine the obstacle’s height, width, and characteristics.
Horses also have poor depth perception and may use the appearance of the jump and past experience to determine an obstacle’s width. [2] Setting consistent expectations of what a wide obstacle looks like in terms of number of poles, type of fill, etc. can help cue the horse and avoid costly mistakes.
Jump features that can improve the horse’s ability to judge a fence include: [2]
- Ground lines or fill that help the horse judge a fence’s height
- Contrasting colors
- Colors that do not blend in with the jump’s surroundings
Common mistakes when setting jumps include: [2]
- Creating a false ground line: Any fill or ground lines should be placed in front of or flush with the jump rails. Never place fill behind a jump rail, as it deceives the horse into thinking the jump rails are further back than they are.
- The “joker” fence: Jumps that are very “airy” with only a single rail are difficult for the horse to judge. Add in fill or more rails so the horse can judge both the position of the jump and its height.
 Example of a joker fence
Also consider how the horse jumps. Horses jump with bascule, a semicircular arc that allows them to clear a fence efficiently while maintaining balance.
For a vertical, a narrow jump, they take off earlier and the peak of their trajectory is centered over the maximum height of the jump. For oxers, wide jumps, they take off closer to the jump and center their trajectory over the middle of the two rails.
 Example of horse bascule centered over jump
Due to this trajectory, it’s more difficult for a horse to judge very upright jumps. To successfully navigate these fences, the horse must understand that they have to take off well before the jump, to avoid hitting the rails with their front legs during takeoff.
 Example of horse clearing very upright jump without ascension cue
Building ascending jumps, where there is a ground line or fill set in front of the top rail, helps teach the horse when and where to take off. [2] Similarly, ascending oxers, where the back rail is slightly higher than the front rail, helps the horse judge the fence’s width and adjust their trajectory accordingly.
 Example of horse jumping with ascension cue (hay bales on ground in front of jump)
Safe Jump Setup Checklist
Use this checklist before every jumping session to confirm that the setup is safe for both horse and rider:
- Footing is level, even, and provides secure traction
- The arena or jumping area has enough space for straight approaches, landings, and safe turns
- Jump standards are stable, in good repair, and free of sharp edges
- Rails can fall freely and are not pinched by the standards or jump cups
- Breakaway or safety cups are used, especially on the back rail of oxers
- Ground lines or visible fill are used to help the horse judge the fence clearly
- Jumps are easy for the horse to see and do not visually blend into the surroundings
- Related distances are appropriate for the horse’s stride length and training level
- Course layout is simple, uncrowded, and suited to the available space
- Approach and landing areas are clear of obstacles, trees, holes, or uneven footing
- Jump height is appropriate for the horse’s fitness, experience, and current training level
- The rider is wearing a helmet and has a person on the ground available in case of emergency
How to Set a Safe Show Jumping Course at Home
Course design refers to the arrangement of fences within an arena to create a sequence of jumping efforts. In show jumping training, course design influences stride rhythm, balance, turning angles, and the horse’s ability to approach each obstacle safely.
Work with your trainer to determine what type of courses are suitable for you and your horse to practice at home. The complexity and design of courses varies between levels of jumping. Simple, straightforward courses are best when training at home without the supervision of an experienced trainer.
These courses might include:
- Single fences
- Straight lines with 4 – 6 strides between jumps
- Long bending lines with 6 – 8 strides between jumps
- Low one or two stride combinations with appropriate ground line
When setting related distances (lines where your horse must take a set number of strides between fences), ensure you are setting the distances based on your horse’s stride length. Most horses have a 12 foot stride.
Account for takeoff and landing distance from the fence as part of your measurement. In general, the takeoff and landing distance is about the same length as the height of the fence.
Common distances between jumps are: [4]
| Number of Strides | Approximate Distance |
|---|---|
| 1 stride | 24 – 26 ft (7.3 – 7.9 m) |
| 2 strides | 35 – 36 ft (10.7 – 11.0 m) |
| 3 strides | 47 – 48 ft (14.3 – 14.6 m) |
| 4 strides | 59 – 60 ft (18.0 – 18.3 m) |
| 5 strides | 70 – 72 ft (21.3 – 21.9 m) |
| 6 strides | 83 – 85 ft (25.3 – 25.9 m) |
The distances between jumps can be influenced by several factors, including:
- Height of the horse
- Horse’s natural way of going
- Terrain, including up or downhill slopes
- Type of fences, such as oxers versus verticals
When planning out a course, consider your jumping area and any limitations it may have. Ensure each jump or line has at least 4 – 5 strides for the approach and landing, so you can make coordinated turns.
The approach and landing should be clear of any obstacles like trees and uneven footing. Avoid course designs that cluster several jumps in one area, as this can be visually confusing for the horse and makes it difficult for them to assess the fence.
Warm-Up Fences & Gymnastic Exercises
Many riders begin a schooling session with simple fences or gymnastic exercises before attempting a full jumping course. These exercises help horses develop rhythm, balance, and confidence while allowing riders to assess how the horse feels that day.
Common warm-up jumping exercises include:
- Single cross-rails or small verticals approached on a straight line
- Ground poles placed before and after a small fence to encourage the correct takeoff distance
- Gymnastic grids with one or two small fences spaced closely together
- Bounce or one-stride exercises are designed to improve coordination and balance
Gymnastic exercises are especially useful when training at home because they require less space than full jumping courses. When built correctly, they encourage horses to develop consistent takeoff timing and correct jumping form while reducing the need for large arenas or complex course layouts.
All gymnastic exercises should be built with small fences and appropriate ground lines to help the horse judge the obstacle clearly.
Choosing an Appropriate Jump Height
When schooling at home, always set jump heights well within the horse and rider’s current level of training. Training fences are intended to build confidence, reinforce correct technique, and develop rhythm and balance, not to test maximum ability.
Most riders school at heights lower than those used in competition. A common guideline is to keep home training fences approximately two to three competition levels below the rider’s current show height. Lower fences allow the rider to focus on accuracy, position, and course riding without placing unnecessary physical strain on the horse.
Several factors influence appropriate jump height, including:
- The horse’s age, fitness level, and previous training
- The rider’s experience and confidence over fences
- The footing and available space in the training area
- The type of exercise being performed, such as single fences, grids, or full courses
Young horses, horses returning from injury, or riders training without professional supervision should generally focus on smaller fences, poles, or gymnastics. These exercises help develop strength and technique while minimizing the risk of injury.

Rider Safety
Safe jumping also involves rider safety. Always wear a helmet when jumping. Rider falls during jumping can involve high speeds, contact with rigid objects like wooden jump poles or standards, and horse-related injuries. Some riders may choose to wear additional safety equipment like body protectors or inflatable air jackets.
Riders should never jump without a person on the ground to call emergency services if necessary. If you must ride alone, choose alternative exercises such as:
- Hacking out/trail riding
- Flatwork only
- Polework
- Low jumps or cavaletti
Contact a trusted person to inform them of your estimated ride time and where you will be riding. Let them know when you get on the horse and check in with them regularly throughout the ride if possible.
Frequently Asked Questions
Here are some frequently asked questions about setting up show jumps safely at home:
Safe show jump setup starts with level, secure footing and well-maintained equipment. Jump standards should be stable, rails must be able to fall freely if struck, and there should be enough space for the horse to approach, take off, and land comfortably. Safety cups or breakaway cups are recommended to reduce the risk of a horse becoming caught in a fence.
Horses need enough space to approach a fence in balance, jump it, and regain rhythm after landing. Ideally, a jumping area should allow several canter strides before and after each obstacle. Larger arenas allow more complex courses, but smaller spaces can still be used safely for single fences, grids, or simple lines.
Safety cups are designed to release the rail when struck with enough force. This allows the pole to fall instead of trapping the horse's legs, which helps reduce the risk of serious falls or injuries. Many safety guidelines recommend using breakaway cups on the back rail of oxers at a minimum.
Ground lines are commonly used because they help horses judge the takeoff point more accurately. A pole placed on the ground just in front of the fence improves depth perception and encourages a safer jumping effort. Some advanced training exercises may omit ground lines, but they are beneficial for most schooling situations.
Wooden jump rails are generally preferred because they are durable and fall predictably when struck. Poles should be smooth, free of cracks or splinters, and long enough to sit securely on the standards. Extremely lightweight materials or poles that splinter easily may create safety risks.
Distances between jumps depend on the horse's stride length and the number of strides intended between fences. Most horses have an average canter stride of about 12 feet, and course designers account for takeoff and landing distances when measuring related lines.
Training fences should generally be lower than competition height so the rider and horse can focus on technique, rhythm, and confidence. Many riders school at heights two to three levels below their current competition level, especially when riding without direct supervision from a trainer.
Simple fences such as cross-rails, small verticals, and low gymnastics are often safest for home training. These exercises help horses develop balance and jumping technique without requiring large arenas or complex course designs.
Beginner riders can practice jumping at home if the setup is simple and appropriate for their experience level. Low fences, ground poles, and straightforward lines are typically safest. Riders should follow guidance from a qualified trainer and avoid building complex courses without supervision.
Jumping alone carries additional risk because no one is present to assist in an emergency. Riders should ideally have someone on the ground, wear appropriate safety equipment, and inform a trusted person of their riding plans if they must ride without supervision.
Horses may refuse a fence if they cannot clearly judge the obstacle, feel unbalanced on the approach, or encounter poor footing. Jump design, course layout, and rider balance can all influence whether a horse approaches a fence confidently.
Using contrasting colors, visible ground lines, and fill beneath the rails can help horses judge the height and position of a fence more accurately. Avoid jumps that blend into the background or appear visually confusing from the horse’s perspective.
Summary
Setting up show jumps safely at home requires careful attention to footing, equipment, and jump placement. A thoughtful jumping setup helps protect both horse and rider while supporting effective training.
- Choose level, well-maintained footing with adequate space for approaches and landings
- Inspect jump equipment for cracks, splinters, rust, or other hazards before building a course
- Use safety cups or breakaway cups to reduce the risk of injury
- Keep course designs simple and appropriate for your horse’s training level
- Add ground lines, fill, or contrasting colors to help horses judge fences accurately
- Always wear a helmet and have a person on the ground available when jumping
References
- Fabian. E. Riding Arena Footing Material Selection and Management. Penn State Extension. 2016.
- Tinder. S. D. Jump Course Design Manual: How to Plan and Set Practice Courses for Schooling Hunter, Jumper, and Equitation Riders. Trafalgar Square Books, North Pomfret, VT. 2012.
- Jumping Rules 2025. Fédération Equestre Internationale. 2025.
- Distance Guide. British Showjumping. 2018.


